LIMITED addition “Hello Paradise” perfect for stamping your Seaside Memories. Is retiring on March 31st

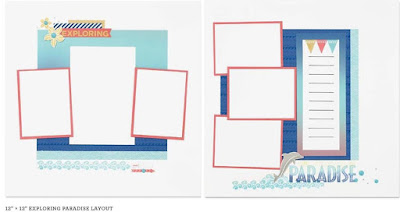
I have so many people tell me they just don’t know how to use stamps in Scrapbooking. Well this is the perfect set to get you started and would receive plenty of use. See layouts below.
This exclusive Hello Paradise stamp Set is available now through the end of March ONLY !! 

Take advantage of this month’s Stampaganza promotion to earn a free stamp set when you buy two at regular price—that means that this beautiful set could be yours for FREE when you choose two other stamp sets ! Get your order in now and stamp your way to paradise !!
Don’t know which other 2 stamp sets to buy ? Alphabets are the first thing out of my mouth for scrapbooking. 
I will do you one better, purchase 2 stamp sets to get “hello paradise” free and I will send you a FREE pdf. file with directions to complete these 10 layouts featuring Regatta paper packet.



Online Adult Coloring / Making the Grid

1. Use pigment ink to stamp grids, to prevent bleeding.
2. Always stamp grids on a separate cardstock (not the actual notecard base), depending on what your coloring medium will be (pencils, crayons, markers or watercolor), there is always the possibility of bleeding through. I always color on separate cardstock , then mount on colored cardstock to make my coloring "POP", then attach to the front of the notecard base.
3. Apply ink generously with short taping into the ink. Pigment ink pads are foam, you don’t want to squish down too far, or you will get excessive ink and loose your detail.
4. As with all stamping it is best to leave down a few seconds with even downward pressure, giving paper time to except ink (not too hard or you will loose detail). Leaving down longer is always better then pressing harder.
5. Always work from light to dark stamping off till clean on scrap paper, before using next color. Thoroughly clean with warm soap and water when finished stamping ( I use dish soap ). If you must clean during project, make sure stamp is thoroughly dry before continuing to stamp.
6. Pigment ink takes longer to dry. Make sure ink is COMPLETELY DRY before you begin coloring.
7. Store ink pad upside down to keep the ink at the surface of pad.


 My favorite current Adult coloring Grid making stamp sets:
Click on image to purchase !!


My favorite current front sentiment stamp sets:
Click on image to purchase !!!


Stress Free Adult Coloring Class - Sunday March 20th 2-4pm - $25.00

Coloring used to be reserved for children and the occasional adult who got to babysit them, but recently, the activity has found a different demographic. Coloring elicits a relaxing mindset, similar to what you would achieve through meditation or petting a purring kitty. It allows us to switch off our brains from other thoughts which automatically reduces stress & anxiety.
Why hide all your beautiful coloring in a book? Learn how to turn all that fantastic, time consuming coloring into  greeting or note cards.  At class you will learn how to stamp creative coloring grids & greeting card embellishments to easily turn your coloring into cards that can then be shared with friends and family.

Adult coloring, therefore, presents a creative venture without the need for artistic flair. One simply needs to color within the lines in order to get the desired effect.
A majority of the coloring will be saved for an at home stress-release. You will leave class with featured stamp set (Dizzy Circles) so that you can make as many more card grids as desired for more stress free coloring. Class will include supplies to create 5 cards and envelopes.

Additional Supplies Required
Your favorite markers or pencils to color with, Adhesive, glue dots & scissors.
If you would like to start coloring with alcohol markers, Please check out my ShinHan Marker Club
Optional additions:  Acrylix Blocks, 12 x 12 trimmer & piercing tool
Contact me today at kimstom@wcnet.org or Facebook to get registered.
SUBJECT LINE: Adult Coloring


"Charlotte" Crop til you Drop Event - Saturday April 23rd 10-8pm $60

This day will be full of creativity, friends & fabulous Close To My Heart products !
Here is what is included in your $60.00 registration fee...
  • All papers, ribbon, embellishments & page protectors to complete 6 - 12x12 two-page layouts...YES that is 12 completed pages…
  • 4 feet of table space
  • Homemade Lunch & dinner
  • Product displays to get new ideas
  • Highlighted techniques will include Basic Watercoloring & ink stamping for embellishments.
You are required to bring sturdy adhesive, 12" personal paper trimmer & scissors to all classes. MUST RSVP

Springtime Wishes Cardmaking Class - Sunday April 10th 2-4pm

Create these 3 gorgeous cards to celebrate and give thanks for the special times in your lives. Your friends and family won’t believe you made them yourself. Basic water coloring and use of “thin cuts” will be instructed. This workshop uses the “Charlotte” paper packet and features My Acrylix stamp set "Springtime Wishes".

In addition to making 3 embellished cards, you will also receive the featured stamp set, envelopes & black pigment ink square.

All this for just $28.00 What a Deal !!

Required Supplies: Adhesive, glue dots & scissors
Optional additions: Acrylix Blocks, 12 x 12 trimmer & piercing tool

Contact me today at kimstom@wcnet.org for more information and to get registered.
SUBJECT LINE: Card Class


Penelope Workshops Your Way™ KIT

2 of 4 video featuring Penelope Workshops Your Way 

 
I know discovering your creativity brings you joy. That is why I wanted to share the new Workshops Your Way kit programs, which helps you make several pieces of artwork with just a handful of supplies. Your workshop kit contains all the products you need to create three scrapbooking layouts plus a Picture My Life pocket scrapbooking layout (4 of 4 video) With the help of the online guide, trimming tools, and adhesive, you can turn this collection into beautiful layouts that are truly works of art.
AND since I love using up all the leftover goodies, CTMH has also designed a set of adorable cards (video 3 of 4) that you can create using the remaining workshop materials and a few extra items. They'll even show you how with the online guide !

Choose just how creative you can be with Workshops Your Way.

Video 1 of 4: Penelope Workshops Your Way™ Cutting Guide


Think Spring with Kaleidoscope Scrapbook Class - March 16th 7-9pm & April 30th 10-noon

As you gather with friends and family to celebrate Spring activities take the photos you will need to fit the layout that you already have made at home. Jot down some notes for filling in the journaling boxes on your scrapbook page as well. When the event is over, print your photos and complete the scrapbook page.
See how creative you can be using CTMH lay-out books, beautiful patterns inspired by Jeanette Lynton. Designed & taught by Kimberly Thomas. Mail Order Option also available.
Class includes direction and cutting diagrams to complete Three 12x12 - two page lay-outs, featuring "Kaleidoscope" Paper PacketYou will go home with 6 completed pages (this includes all papers, Cricut Cuts, page protectors and jeweled adhesive-backed embellishments ) Ready for photos. 
Kim will be teaching you how to work from lay-out books and the art of creative cropping with your photos. Also learn how to work with negative space - filling it in as well as using the leftovers.

You are required to bring sturdy adhesive, 12" personal paper trimmer & scissors to all classes. MUST RSVP